Sunday, December 7, 2014

The Sinbad Cyclops: A recreation

Here's a record for me: The longest I've ever taken to finish a puppet! And one made for a client to boot. I started building this puppet in 2011 and just finished it a couple of weeks ago.
Any die hard stop-motion fan can see that this is a recreation of Ray Harryhausen's perhaps most famous puppet character; the cyclops from "7th Voyage of Sinbad". Making accurate recreations is NOT my best talent, but I hope I got most of the details right. This will be the last job I undertake of this sort. I much more enjoy creating original, if derivative, characters.


I've already made two posts about this project some years earlier, but I'll try to summarise what I've talked about before. The cyclops started life as a chavant clay bust. This was the part of the puppet I felt I needed to have the biggest control over, while the rest could be built up using my preferred construction techniques.


This puppet, like most of my puppets, is built up using layers of soft polyurethane foam covered with bits of latex skin. The hooves are cast in SmoothCast plastic from a silicone mould of a clay sculpture. Apparently I never took a photo of the armature, but it's my usual aluminum/Friendly Plastic concoction. The eye is a plastic ball with a Photoshopped iris printed on paper and glued to the ball. The eyeball was dipped in Crystal Clear casting resin and hung upside down to set, and create a transparent lens over the iris.


The finished cyclops, with fake fur for its legs, latex teeth and claws, and a latex/cotton club built up over a piece of wooden dowel. The horn is built up with melted white Friendly Plastic. A light paint job of drybrushed PAX paint guilds the lily. The plan is to send the cyclops off to his new master before Christmas.


Sunday, November 30, 2014

Witchouse Monsters part 1

It seems I will be lending my time and talents to quite a few projects during 2015. I have lots and lots of stuff I want to do myself, not to mention stuff that needs to be finished, but I thrive on collaborations, especially where several talents are involved and each contribute to a piece of the creative puzzle.
Here's one of those collaborative projects: The video-horror-musical "The Dreams in the Witchhouse", based on the rather good tale by H P Lovecraft. The mastermind behind the film is Brian O'Connel, who apparently acquired the rights to the music from the Lovecraftian rock opera of the same name.
This time I'm not designing the stop-motion beasties, I'm building puppets based on drawings from DeviantArt artist KingOvRats.


This octopoid creature will be one of several monsters floating around in a parallel dimension, which the "hero" Walter Gilman" visits in a hallucinatory experience. I decided to make the puppet rather big, and started with a head sculpture in Monster Clay. Details like the saw-toothed edges on the monsters beak/snout and the crest of spines were added later.


Most of the puppet was actually built up in a rather improvised way, which I don't do very often. The head was such an important feature, though, that I felt that had to be made as exact as I could replicate it from the design drawing. 


To create the tentacles, aluminum wires covered with soft string were dipped in liquid latex, and casts of wrinkled and textured latex skin pieces were stuck on as a covering.


The spine was another bit of thick aluminum wire, covered with Friendly Plastic thermoplastic to simulate unbending bony parts. As you can see, the creature will eventually be quite blue. The green support rod at the rear part is detachable, and will only be used when animating the puppet against a green screen. The saw teeth have now been attached, and are simply made by cutting out the shapes in paper, and then covering them with tinted latex.


The body was built up with simple foam padding, augmented with thick layers of cotton held in place with a thin cover of liquid latex.

The skin on the body was created by casting multiple smaller patches of latex from many old plaster moulds. Additional texture were created by simply dipping pointy dental tools in blue-tinted latex and dripping warts and small wrinkles onto the skin. The spines on the crest were created by mixing latex and cabosil to a butter-like paste, and rolling the goop into pointy shapes between my thumb and index finger.


 The puppet is now ready for it's final touch up, which is a coat of tinted PAX paint (Pros-aide glue + acrylic paint), and finer detailing with acrylic airbrush paints. This was a fairly simple puppet to build. For example, it didn't need any complicated head joints for jaw or brow movement. The lack of joints also makes it very light for a puppet of its size, which is a little over a foot long.


Here's what it might look like in its natural habitat. We'll see how this project develops, and how long it'll take to finish. It's presumable that all involved will work on it on and off for quite some time, but that's the nature of non-commercial projects. All those crowd funded films seem to take forever to finish up, but it's eventually they do get made and released, and we should all be much happier for it. Every finished little rogue movie points the way for more of the same, and perhaps also to the future of film making as we know it. 


Sunday, October 5, 2014

The Loneanimator Stop-Motion Puppet Book

I've been making puppets for dimensional animation for the past 20 years or so. For the past 10 years I've been documenting the creation process by snapping lots of photos, and some of them have ended up on my web page or blog, but most of them have just been saved in digital folders.
This summer I started looking through those folders with the intention of collecting most of them in a self-published book. I'm still at it, since I have at this point made over 100 puppets. Not all of them have survived the natural decomposition of latex materials, though, and not all of them have been thoroughly documented during their creation.


This book is very simple in its design and structure. It'll be mostly large images, with some explaining texts. My aim with this book is to provide inspiration for those of you just starting up their stop-motion film projects, to show what's actually possible to do with very limited means. Then there are people who are just interested in the craft of stop-motion animation and puppet building; hopefully this book will be of interest to those too.

There will be more updates about this project soon.

Wednesday, September 10, 2014

D & D Monsters: The Beholder

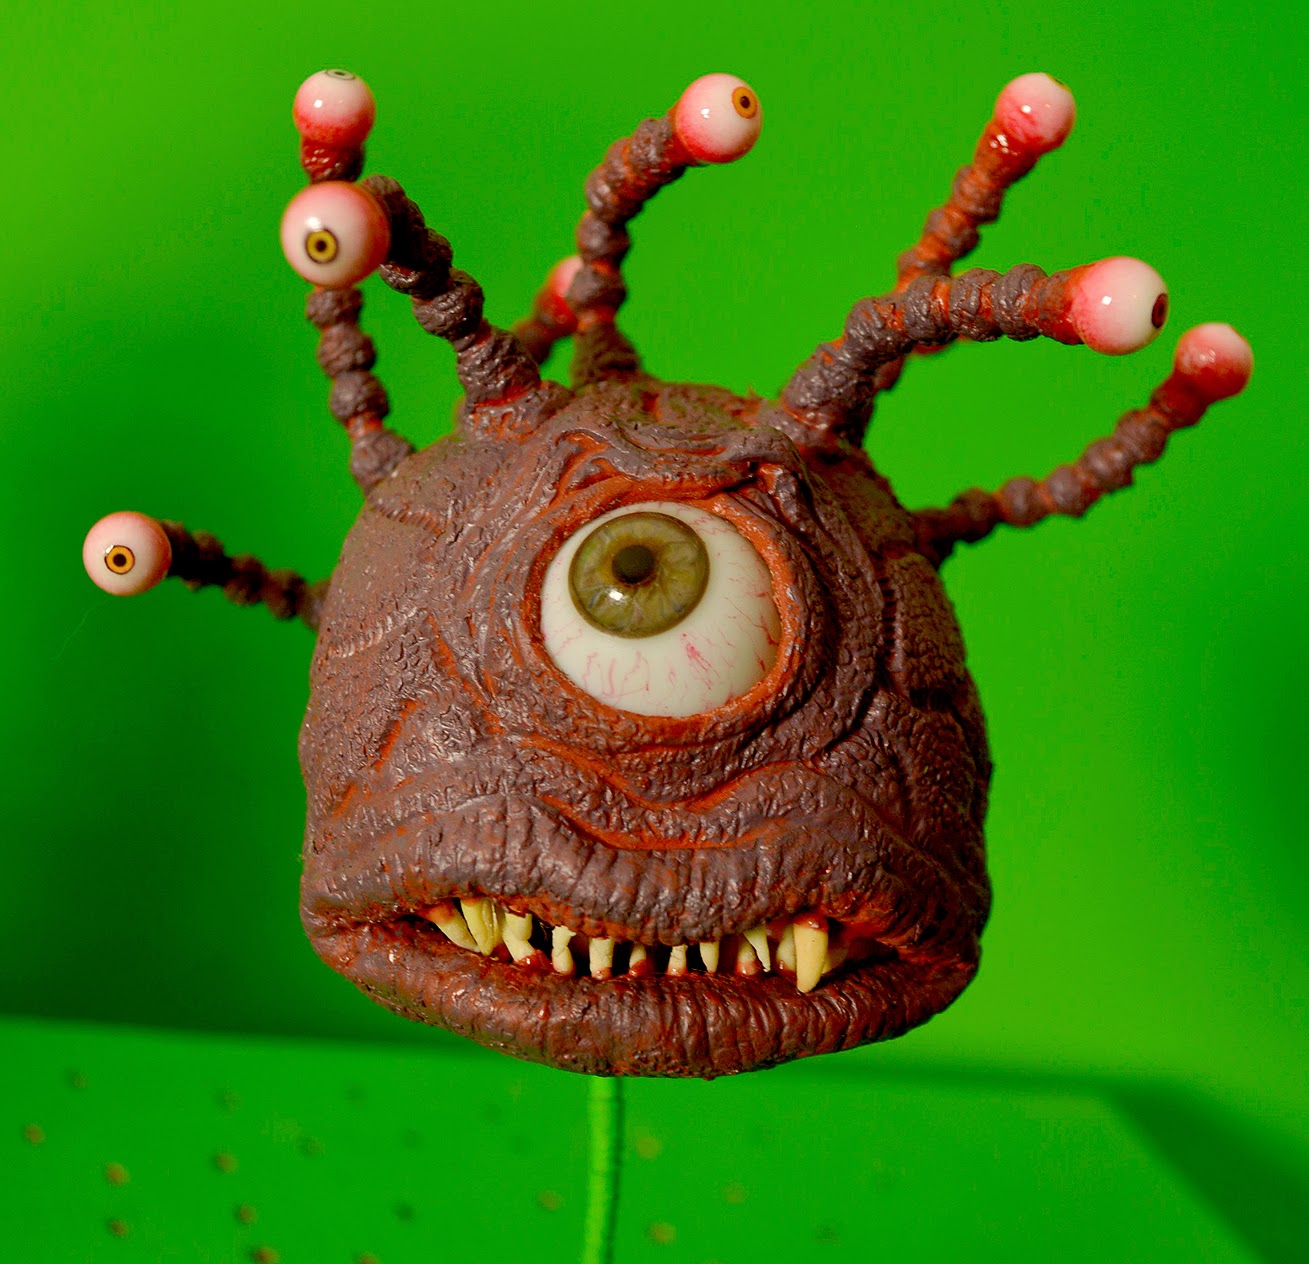
Yet another monster for my collaborative (as of yet nameless) fantasy film project with John Hankins. If you're making a film filled with Dungeons & Dragons monsters, you can't do it without the infamous "Beholder"; a floating, gnashing monstrosity, which is more than an awful eyeful.

 Here's how the Beholder was originally depicted in the first "Advanced Dungeons & Dragons Monster Manual" from 1977. There have been much scarier, more detailed illustrations since then, but because John and I are trying to recreate an innocent retro feel for our project, this is the design I based my puppet on.


This is my first rough clay sketch of the beholder, something John and I could discuss. As it turned out we went with this design with very little alterations.


 Here's the finished clay sculpture, executed in Monster Clay. The eye stalks are not there for the casting, as they will be added at a later stage as built-up features. The holes for the stalks are there, however. The big watery eye comes from a discarded mannequin. I added some extra blood veins and covered the whole thing in transparent lacquer.


I cast the sculpture in a two-part mould. It's a slight bit of a hassle, so I don't do this very often. Half the sculpture is walled off with a softer clay simply called "plastellina" here in Sweden, but it has nothing to do with the famous Roma Plastillina sculpting clay. As you can hopefully see I've added three small bumps in the clay wall.These will become "keys" in the plaster mould, helping to interlock the two mould halves.


This is how the two-part mould turned out. Monster clay comes out easily from plaster moulds, but you can see some brown residue from the softer "plastillina".


Ordinary liquid latex is tinted with universal tinting colours and dabbed onto the inside of the plaster mould halves with a sponge. Four layers of latex was added this way to build up a sturdy, but not too firm latex skin. I went with a rust red/brown hue, which will form a good base for the additional layer of colour going on when the whole puppet is finished.


Here's the important detail, though. The insides of the latex puppet halves are lined with thin sheets of foam rubber. This will add support without making the latex skin too leathery and still allowing some stretch.


A plastic bottle screw cap becomes a cheap but effective eye socket for the glass mannequin eye. Friendly Plastic thermoplastic holds the cap in place, allowing the eye to swivel freely. I've also added the first two eye stalks, held in place by the plastic.


The two body halves are now joined together with contact cement, and the join is covered with more tinted latex. A thick but bendable aluminum rod has been added to the screw cap using more Friendly Plastic. This rod is a support to keep the "floating" puppet aloft while being animated. I've covered the rod with soft string, which will ease the application of the green screen paint, which will be added later. I've also added a looping piece of string wrapped aluminum wire to the insides of the lips.
 

The eye stalks are aluminum wires covered with soft string, and then tinted latex. The eyeballs are plastic balls used to make "pearl" necklaces. I've ground down a flat area on top of each ball, where a printed photoshopped iris image has been added. The eyeball is then covered with Glossy Accents, which is a transparent, slightly rubbery air drying plastic used by scrapbookers.


Time for teeth! These are simply made by mixing latex with cab-o-sil (fumed silica), which creates a butter-like latex paste. Rolling this paste between your thumb and index finger will create small, pointy, flexible, bone-white bits, which dries quite fast in normal room temperature.


The teeth are stuck to the mouth using tinted liquid latex, and the hole in the puppet's bum is covered up with a cast latex skin patch. The inside of the mouth is created by contact cementing two pieces of thin urethane rubber to the inside of the mouth cavity above the lips, and covering these with cotton shapes and tinted latex.


To finish the puppet a thin layer of purple PAX paint is sponged on over the puppet, taking care not to over apply and cover up the various wrinkles and crevasses on the puppet body.


Hopefully, John's encounter with the Beholder will look something like this. Beholders are among the "boss" creatures of fantasy gaming, so they're not just ugly; they're smart too. They're also able to fire various nasty energy emissions from their eye stalk eyes, so it's a meeting between hero and monster full with exciting possibilities!

Wednesday, August 13, 2014

D & D Monsters: The Rust Monster

Continuing with my collaborative video project with John Hankins, next up is this critter, which is really one of my favourite monsters in the world: The so-ugly-it's-cute rust monster. This creature will strike at your weapons or armour, making them corrode instantly so the monster can feast on the rusted remains.

The image to the left is the rust monster I grew up with; the illustration from the legendary 1977 "Advanced Dungeons & Dragons Monster Manual", complete with wacky propeller at the tip of its tail. The one to the right is the more recent, anatomically believable concept, perfect for a movie creature. Which is why I'm not using it. I'm going with the original version, and am making very few excuses for its cartoonishness when building the puppet.

D & D also released a line of hard plastic miniature monsters, of which I have a few since childhood. Among these is the rust monster. I had it sitting on a shelf next to me while building the rust monster puppet, mainly as inspiration rather than an exact guide.


I sculpted the main body in Monster Clay. This would become a shell cast in two pieces, under which the limbs would be attached. The eyes are plastic albino mammal eyes bought from a taxidermist supply shop.


Here are the two main body pieces cast in latex with a latex/cotton reinforcement. You can see some of the cotton sticking out from under the belly piece.


To add extra sturdiness to the shell parts I mixed the extremely fast-setting OOMOO plastic from Smooth-On, and poured it into the latex skins, creating a very hard interior, but keeping a leathery exterior.
The antenna are aluminum wires wrapped in soft cotton string, and dabbed with tinted latex. I use liquid universal tinting colours to dye my latex. They're a bit pricey, but last forever, as you only need a drop for each batch of latex. The eyes are glued in place with flexible super glue.


I already had an old plaster mould for a wrinkled, muscular tail or tentacle, made for a previous project. I covered a bit of aluminum wire with soft string, soaked that in latex, and pressed it into the plaster mould. I wrapped the latex skin around the tail, and used liquid latex to cover up the seam. The tail propeller (or whatever it's supposed to be) is a piece of cardboard covered in latex.


The limbs are starting to grow out of the rust monster. They're all attached to the plastic inside shell using Friendly Plastic thermoplastic. I've also added a jointed lower jaw with two latex tusks.


Using small bits of soft polyurethane foam the muscles are built up over the legs with flexible Casco contact cement, and then covered with latex skins. The legs are given a thin coat of tinted latex.


Finally, a thin layer of PAX paint (acrylic tube paint and ProsAide No-Tack make-uo glue) is sponged on. This creates a very good surface for Liquitex acrylic airbrush paints. A thin coat of transparent acrylic primer goes on lastly.


And here's the finished rust monster on my animation stage. I'm hoping he'll be a treat to animate!


A Photoshop mash-up of John as the intrepid questing hero, who is apparently unaware that swords and rust monsters are a bad combo!